Monday, October 28, 2013

Creative Creations DT - Sassy Studio Designs - Books

Greetings

I have been very busy with Halloween and Christmas cards and crafts so it was really refreshing to do a card that was very different.
This card I did for the the CREATIVE CREATIONS DT the theme of the challenge is Books (inspired by books) I chose to do this cute little Fairy Sassy tinker from SASSY STUDIO DESIGNS.

We would love if you would come over and play, take part in this awesome challenge and strand the chance of winning 4 Digi's from Sassy Studio Designs!!

I have always loved the story of Peter Pan and Wendy, and Neverland has always appealed to me and always been somewhere I could like to see my self living.  It has all the things that appeal to me, and fairies yes fairies like Tinkerbell ... I love tinkerbell!  She was essentially the only female in Neverland and yet managed to keep all the boys in line, what a woman!

One of my favourite quotes from the book:

“When the first baby laughed for the first time, its laugh broke into a thousand pieces, and they all went skipping about, and that was the beginning of fairies.”
― J.M. Barrie


Sassy Tinker - Pop up card


For this card I used an A5 card folded and then a pop up of Sassy Tinker on the inside, I coloured her with copics and the paper in the "book"  is Pebbles.


 The thought behind my card was to make the base look all old and vintage as the original Peter Pan was written in 1911 and then I made lil Tinker Sassy all bright as she is known and loved in the Disney movies today, the contrast is just beautiful.

There are so many other beautiful quotes from the book and I would love to share a couple more of my fairy fav's :

 
“One girl is worth more use than 20 boys.”
― J.M. Barrie


“All the world is made of faith, and trust, and pixie dust.”
― J.M. Barrie


Thanks so much for reading till the end, as always if you have any queries about this or any other project you have seen here I will be happy to answer what I can, ALL comments will be greatly appreciated.

Till next Time, keep it crafty


Thursday, October 24, 2013

Challenge - Outlawz - Awareness Card - MS

Greetings,

So here today I will proudly display a card that I finally finished late (Due October 17th) , I keep threatening to get my cards in on time and yet they are nothing but empty promises ... This challenge really struck a cord with me because I am such an avid supporter of MS (Multiple Sclerosis) Awareness.  Not many people know what this disgusting disease is and some very naive people think it can be cured by taking a holiday or changing your diet!

Well its real and sadly there is NO CURE!! It is destroying lives every day, it steals and robs family members from their families and steals futures out from its victims feet!  So even tho I was too late I decided to make this card anyway.  The ribbon colour for MS awareness is orange so I coloured my card theme orange and I am going to share it with as many as I can.  If you would share it too that would be so great, lets UNCHAIN the ignorance and rumors and start reaching and teaching people the truth about MS!!!

An awesome guy Johann I know from the MSSA group, he runs a project called Unchaining MS is a project to raise awareness for multiple sclerosis, including an annual bike trip. Next trip provisionally between 26 Apr - 10 May 2014. I love the slogan of his organisation and he kindly agreed to let me use it on my card!! If you would like to find out more click UNCHAINING MS to go his website or find him on Facebook

Here is my card I will still post to The Outlawz - October 17th challenge but not for a prize :)


Card made for an AWARENESS Challenge!

I bought this digi from KennyK and the name of this gorgeous image is Viki Lee Vicous I did wonder if she was any relation to Sid ;P 

I dont use orange much when colouring as a choice, I will if I am colouring something that is obviously orange, but given the choice I usually opt out.  So this was a challenge for me but in a good way as I got to make friends with all the oranges in the bunch :) The reason I chose her was that I wanted an image of a girl that couldn't be reconned with and Vikki here was the perfect match ...

I did alot more shading on her hair than you see here, but for some reason it didn't come out when I photoed it, the streaks look really obvious, but I love how unintentionally her hair looks like flames!


Close up of the coloured image
 

I searched the for a beautiful ribbon back ground paper that I could use but I could only find pink, so I made my own, I have sheets of this paper available in acetate and card and I can also do different coloured awareness ribbons if you like.  Just send me an email here and I can give you more details. I also printed the slogan from Johan on acetate as I had not yet decided which colour I was going to to the background.  

I think it all came together nicely and I really enjoyed making this card!

As always thanks so much for visiting and reading to this point! Your comments (good or bad) are always welcome and very much appreciated.  If you have a query about this or any other project you have seen on my blog please let me know and I will do my best to help you out.

Till Next Time, Keep it crafty,


Thursday, October 10, 2013

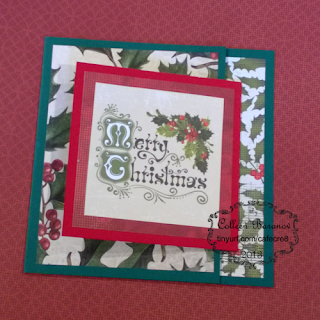
Joy Fold Christmas Card

By Colleen Baranov

 You will need:
  • 1 Sheet of card stock (25cm x 15cm) (green)
  • 1 Sheet of card stock in a different colour (10cm x 20cm) (red)
  • Printed Christmas themed paper about 3 different sheets
  • Sentiment or Christmas embellishment
  • Basic tools : Cutting knife or trimmer, craft mat, metal ruler, paper glue, embellishment glue.

Step One

 Cut out the 25 x 15 cm piece from one of the sheets of card, I used a dark green, and score it at 15 cm.  Next cut a 10cm x 20cm piece of card from the other colour (in my case red) and score that down the center at 10cm.


 Step 2

Fold your 2 piece of card on the scored line. Cut out the pieces from the printed paper in the following sizes: A) 14x14cm, B) 9 x 9cm and C) 14 x 9cm.
  

 Step 3

Open the large card - the small fold should open to the left, paste A (square of printed paper) onto the right hand side of the card and paste B the smaller square of printed paper on the FRONT of the smaller folded card.  NOTE: the smaller card should open (backwards) to the right!
 

 Step 4
Close the large card and paste the remaining piece C on the outer side of the card.


 Step 5
 Making double sure that the large card opens to the LEFT and the small card opens to the RIGHT, put some glue on the back of the small card and paste it in the center of the INSIDE of the larger card.


 Step 6
  To check that it is correct open both cards, fold the larger one, and then fold the smaller card over the front of the larger card. It should look like the pic above.


Last Step
   
 Lastly add your own personal sentiment or embellishment to the center of the smaller card, it could be a stamped image, a shaker box, a die or a cut out, the possibilities are endless.

Products used in this project - None sponsored
Treasures card stock pine and red
Kaiser Craft Paper - St Nicholas Collection and Christmas Carol Collection
Tombo Mono multi glue (green glue)


Things to remember:
  1. Make sure you have an envelope to fit your card and if yours is slightly smaller simply adjust the measurements at the top to fit, ie minus 1cm from each measurement.
  2.  If you are posting your card, make sure that the postage will cover the (not standard) size envelope you are using.
  3. Be careful when putting on embellishments, make sure they are not too bulky or fragile or they may be crushed during postage.
  4. A very useful tip is to put on the envelope - "handmade card only -NO VALUE" this will hopefully make it a little less tempting to possible thieves.
  5. Put your name PROUDLY on the back of the card! Regardless of how you rate your creation handmade cards and gifts are appreciated by ALL that count! 

This project can be purchased in a kit form from me at a cost of $7 incl P&P, the Kit will provide all the paper and card that you will need to complete this project as well as a paper sentiment.  It does not include any glues or tools.  You will need to cut to size all your own paper and card.  Please note that each kit's designs will vary from that shown in this project.


 Thank you for getting to this part of the tutorial, if you would like any more info on this or any other project on my blog please dont hesitate to contact me.  Comments, crits, and future tutorial requests welcomed :)

Till next time, keep it crafty


Tuesday, October 1, 2013

KennyK with sketch for Creative Creations Design Team

Greetings

I have been so busy sewing (yes I do sew ..... more about that in my next post)but still managed in between to get my fix of Copic Love and an awsome Kenny K image for the September Creative Creations Challenges Design Team.

We were given this sketch, and as cute as it was I still flipped mine 90' to the right!
 
  
September Sketch for Kenny K card

I am so in the spirit of Christmas ALREADY that I had to choose a Chistmas image, the one I chose from KennyK  and the gorgeous image I chose was Santa's Cookies she is such a cutie!! I also had this beautiful KC Christmas paper that I just got and wanted to use so I got colouring!!

I did this one first ....

KennyK image for Creative Creations DT


The Copic colours I used were: E51, R29, B12, G02, Y02, R37, R59, G05, B23, E43, E37, E33, W-3, YG63, E47, BV29, YG23 & colorless blender.  

The paper and sentiments used are from Kaiser Craft - Santa's List Collection.


I really liked the red and blue but then her face was a sun kissed for someone living in the snow ... lol so ......

Then I did this one .... 

KennyK image for Creative Creations DT  

This one is alot lighter and the tones alot more muted but it still has a festive feel.  I did a much lighter complexion here and this time with darker hair.
 

The Cpoic colours I used were: E51, C-5, YG03, BG15, YG63, E43, G00, R29, R00, R0, E57, YG11, RV29, R37, E31 & colorless blender.

The paper and sentiments used are from Kaiser Craft - Christmas Carol Collection.


I am not sure which image I prefer they are both so different, I am a little biased asz chartreuse is one of my favourite colours. 


Thank you for reading this far, I really appreciate it!  As always if you would like more info or have any comments on these or any other proects you see on my blog I am happy to share any advice or info :)

Keep it crafty, till next time


Tuesday, September 24, 2013

Creative Creations Challenges - Early Christmas

Greetings,

Christmas is coming .. its coming and those of you who know me will know that its my all time favourite time of the year, Christmas is like a hobby, an obsession ooooh I am just SO excited!!!!

That explained you will understand my absolute delight when I was given this image to do  for a challenge on Creative Creations Challenges my first Christmas crafting for 2013, it has really inspired me to start some other crafts now too, I need to fix up and add some additions to my advent calendar, I bought a 1:12 Christmas cupboard which I want to do a room in and a couple of quilts and other sewing projects.  Some X-stitch decorations and a couple of secret projects (those being all the UFO's i have from all the passed Christmas's shshshsh)

So here is my Christmas candle card, I (of cos) coloured it with copics, and then put it onto the stunning new Kaiser craft a Christmas paper.


Christmas Candle for Creative Creations Challenges


I am really embarrassed about one little feature on this card, no laughing now guys!! Have a look at the "joy" tag .... could I have stuck it any lopsided? Oh my word this card making business is tricky! The rest I am very happy with it was a challenge trying to get the curves and the shadows of the holly leaves, but i do like them.

As always if you have any comments or suggestions please share or if you require more info about this or any other project I will happily share.  Thank you so much for visiting!! 

Till next time, Keep it crafty!


Tuesday, September 10, 2013


Greetings and L'shana Tova Umetuka to all my Jewish Family and friends.

This here will be the Rosh Hashanah issue lol I have been as crafty as my bug would let me be, somewhere in the haze of last week I managed to put together the following creations.  I have my amazing husband to thank for the Apple and Honey picture above - his work rocks! 

Mel's Food table decor - absolutely stunning!!

I felt extremely privileged to be asked by my MIL to make some name place cards for the Yom Tov table.  MIL always does everything so beautifully, from the table decor to the food and everything is always perfect and it is such a treat going to her for dinner.  I must admit that I did feel a little scared of creating things for her table, I hoped they would measure up to her high standards.  This is how they turned out and I got to use my Top Notes die from Stampin' Up again (any excuse) - 

Name Place Cards with apples, name and a Rosh Hashanah symbol

I was also really honoured to be asked to take a fruit salad, now you must understand, this would be the first EVER thing I have been asked to take to MIL for any meal whatsoever. I have been waiting years for this privilage as I don't keep a kosher kitchen.  Clean, germ and yuk free but not kosher :( 

I am also not really a fruit salad person, I dont eat it and I don't make it for my family.  I will cut up fruit for a platter but it will usually just be one fruit.  I had been asked by one of my MIL's friends to make a fruit salad before but i worried as it looked insipid and more like  a really lumpy soup!  So now i was out of my depths having to make a fruit salad that would have a place on the food table among my MIL's amazing food creations.  

Choosing fruit at this time of the year is also not all that fun - it is somewhat limited!  Anyway I chose the fruits, got to work and this is how my fruit salad turned out - not too bad, infact I was rather impressed and got some really lovely comments from the other guests.  (It also tasted pretty good too - yes I ate fruit salad)

My amazing fruit salad
AND then ofcos no occasion would be complete in my life with out a card, a while back I did bekka with a challah for a friday nigh dinner and this is one of Mo Manning's other Jewish designs he is called Ari with Shofar, I loved colouring him and infact Ben did one too.  They are available from mosdigitalpencil.com


So above are my and Ben's pictures coloured and then we both put them onto a card :) I loved colouring him and he just looked so soft and huggable when I was done :) Yes I coloured him with copics!


As always if you have got this far I thank you so much for reading my post and looking at my pictures, if you have any comments or suggestions they are always welcome and appreciated.  if you would like more info on any of my projects you saw here, I am only too happy to share :)

Till next time,  keep it  Crafty


Saturday, August 31, 2013

Greetings

I know I have been rather quiet for a while its just since DH has started working inter-state that I feel I might go crazy - with him it feels like he has taken half my day lol.  I have been busy doing a craft group at one of my DD's schools they are making polymer clay mosaic mirror's and I also had two really awesome sessions of card making for the schools fathers day stall fundraiser, the girls and I were really productive even with all the laughing :)

I have been sorting out my craft space / area it is so small and in my bedroom at the moment so I am trying to be as compact as possible so as to keep it still looking like a bedroom and not invade DH's space too much ... when it is all neat and tidy and finished being sorted (if that's even possible) I will share some pics with you :)

In the mean time I have been spending every free minute working on another colouring picture, I spoiled myself and bought both the wonderland collections from MAKE IT CRAFTY I adore their stuff and find it so magical to colour :) I have been wanting to do another big image like the steam punk tree house, and decided this should be it :) I will be entering this image for their design team!!  I feel really passionate about Make it crafty ' s amazing digis's and Zoe is a breath of inspiration so please hold all your thumbs, cross your fingers and toes and pray that I get accepted :)

Here is my offering :)

 I used two designs in this image the mad hatter from make it crafty's Mad Hatter digi Stamp - Code: digi-mad-hatter. I plan to colour them all but this guys face, his expression is so often how I feel I look! 
The other image I chose was the mushroom forest digi also by make it crafty :)

I started just with the mushroom stems and some of the vine tendrils as the image was so very busy and i wanted to get some sort of idea where things began and where they ended ...


A little intimidated by the hatter, I decided to tackle the mushrooms first, I did the undersides, the tops of the red ones and some of the grassy areas, 


Next I took on the hatter He needed to be purple and I really wanted his suit to look almost like a crush velvet type fabric so rich dark purples I really like how he came out. This photo for some reason came out absolutely amazing while the next one of the completed design wasn't as nice a photo.  Where is DH with his super camera and photo taking skills when you need him  .....

I decided to be daring and try my hand at some clouds and I am very happy with the way they turned out!! Over all i loved colouring this picture ... it is going into a frame for sure as it is an A4 size.  I also used express-it blending card for the first time and am really happy with the result!


As always your comments and critiques are most welcome,  wish me luck ......

Till next time keep it crafty 


Thursday, July 11, 2013

Greetings,

I wanted to share with you a little project I have been working on.  Yes its colouring lol ....

I am so totally inlove with these "little houses" from makeitcrafty they are adorable and really take you on a trip to a fantasy world, the artist must has such a beautiful imagination, to be able to create such amazing life like little places to live.

They are SO much fun to colour and the detail is absolutely AMAZING, I chose to start (yes i plan to colour them all) with a steam punk tree house, it is just so gorgeous. HERE is a link to the tree on the shops website.  I bought myself the digi of the tree, and started colouring .... 

My medium of choice was my copics and my daughter is also colouring one with pencil water colours. 
I did "borrow" my colour choice from the website where I bought the digi, for two reasons ....1. I believe the artist who drew the design had the perfect colours in mind while creating the design and two, It was the biggest image (full A4 page) that I had ever coloured and felt rather intimidated.

The combination of copper, wood, brass and silver made this digi so much fun to colour.  The light that was shining from the inside looked both warm and mysterious at the same time.

I started with the copper coloured pieces and started with the lightest shades of peach and worked on from there.

Start of steam punk tree house colouring
Next I moved onto the tree trunk, the thing I found most challenging was getting the light to look as tho it was bursting from inside the trunk, It took many layers of colour but I think I eventually achieved the look I was going for.
 
The Start of the trunk


I took a little break from colouring the trunk which after an hour had started morphing on the page, and coloured the leaves on the branches the challenge here was getting the clump of greenery on the left to look further back than the greenery on the left, it was all about the strength of the colour and the shade and direction of shadow on the branches, I am happy with the effect I achieved. I also did a bit of red.
 

More layers on the trunk


I had "rested" enough and did more layers and shading on the trunk and roots, at school whenever we could choose the theme of our art I always drew / painted / sketched an old tree with knotty branches and huge roots - it was just my thing and I loved it! So I think that also helped when I was choosing which little house to start with.  As I mentioned i also did a bit of red this helped to expose the white wood on the balcony, which until I coloured the red, just blended into the house.


Almost completed tree


 In this image i was practically finished I smoothed out all the shading on the tree and I have to toot my own horn as I was most impressed with the effect of the door and the little canopy above the door, Iit really looks 3 dimensional and i was really proud of that.

The above picture I took showed the colours up beautifully but was taken at a really odd angle and made the tree rather fat and short *giggle*,  so then I retook the picture and it didn't turn out as clearly as the one above but the proportions are better.  I have been asked to colour one for someone and they are going to frame it :) What an honour!! I also want to frame this one and possibly do the others and frame them as a set.  


The completed Steam punk tree house
I understand that this image is designed to be coloured with markers or pencils, and that the challenge of the craft is to get the metal to look like metal and the wood to look like wood etc by only using one medium, HOWEVER .....I would love to use foils and accentuate certain parts of the image with foils to give it a real metallic look.  I am not sure yet if it will add a whole lot to the image or completely ruin it.  For now all my foils are still packed in boxes in my garage, so it will give me extra time to contemplate my foiley dilemma.

Thanks so much for reading this post.  It always amazes me that someone would acctually get to this point of the post, so if you did - THANK YOU!!  As always your comments and queries on this post or this project are most welcome and I will endeavor to answer you soonest.

Till next time Keep it crafty.


Greetings,

I wanted to share one of my latest cards with you. I made it for my mom inlaw who is so special and has us over for dinner every Friday night and insists we don't do or bring anything.  The thing is that there are 5 of us (DH and three kids) so I always feel that when ever we go to someone for a meal we ARRIVE!!! My inlaws live on their own and make no mess so to have ALL of us over for a meal EVERY Friday is quite amazing!

What is more is that it is not just Friday food - no one pot wonders, no fish n chips, there is always AT LEAST 3 courses, starts with soup and there are usually two choices of soup, then stunning salad and sometimes fish, then a truly devine main meal, always beautiful tasty meat and veggies and then ALWAYS ice cream AND another pudding and then if you have any space left cake or biscuits and tea!  It is amazing and I so enjoy these Friday night dinners!  

I grew up in a house (Catholic) where it was either fish on Fridays or a toasted sandwich - end of the week food always delicious but definatly not a few course traditional feast (my DH is Jewish) 

So it is VERY difficult to try and portray our true gratitude for this amazing meal each week. We look so forward to the beautiful Jewish traditions, to the lovely time with no technology, just chatting and sharing the evening. 


So I made my MIL a card, I bought the digi from Mo Manning at mosdigitalpencil.com/‎ and it is called Bekka with Challah- I LOVE this image, look at her beautiful face and she looks so humble and kind.  When I saw this image I knew I would have to do it for someone VERY special!!

This is the completed card, I did it blue and white and coloured with Copic Markers.  I made an easle card.
Completed Shabbos Card


Here is a close-up of the coloured image.
 
Close up of Image


As always if you have any queries or comments about this post or this project I will be most grateful to receive them.

Till next time keep it Crafty...

Thursday, June 27, 2013

Greetings 

Wanted to share quickly what I have been up to today.  Yes colouring again ....well these actually took me the whole week to colour but were finally put onto cards today!

These are both for a challenge over at OUTLAWZ in the group Alcahol markers. The theme was  Weddings or anniversaries, I had this little image by sliekje stamps her digi's are all so very cute and I cant believe that she has them all freely available on her blog, she is a gift herself to share her talented so freely! Thank you!! 

For this card I pulled out the old cuttle bug and made a piece of lace which I threaded white ribbon thru,  the little fern leaf that I use so so often to make the little leaves either side of the roses broke today, it is one of my oldest punches, and also one of my favourites.  It made lovely little Christmas trees and added the perfect little sprig of greenery to any bouquet.  I will miss you my beloved punch! I coloured the darling little couple with Copics not too happy with her hair, and the shading on her dress didn't come out at all, so I need to make a note to work on those two things in future, mastering blondes and taking photos of copic white clothing!
Otherwise I like this card it is very gentle!


I coloured this couple with Copics and then made a little arch of roses, I used peel off bells as I have no idea where in the towers of boxes of my stash in the garage are my real little bells - I would have loved to have used them rather.  These two little honeys are Wedding Daisy and Dylan digital delights by louby loo.


Thanks again so much for taking the time to read my post and visit my blog, as always any comments or questions are welcome and appreciated!

I am off to make 50 cupcakes for my daughters for school tomorrow - YAY YAY its break up day YAY YAY!!!

Till next time keep it Crafty


Greetings,

I have been colouring up a copic storm of late, I still don't know where lots of my stash is, buried somewhere in boxes in the garage, I find bits and pieces now and then and its like Christmas with each thing I find!  So copics are easy, they are all in an Art Bin suitcase (with no magnetic sheets) and I can print out what I need and pop them in the case, I can colour in the car, I can colour in the dining room, in front of the TV, or even in bed ;) a thought just popped in my head ... couild Copic also be a verb for eg. "do you Copic in bed?" hmmm interesting ... back on track now- so for the few competitions and challenges I have entered recently I have used a coloured image on a different background. 

So I will share a couple of my pics and cards with you, I have so enjoyed playing with these fabulous pens but as you will no doubtly see I still have a very far way to go, lots to learn!!  I have put my name down for a colouring class with Copic Australia but as yet they havn't got back to me, so what you are about to see is my self taught attempt at Colouring with Copics.


 This cute little Koala is an image I got from Digital Delights by Louby Loo and it is called  Ice cream Roxy it is such a cute little bear, it was for a challenge on the outlawz and the theme was ice cream.  I really liked how the sand cam out i just tore a piece of scrap card and it worked so well, as luck would have it if i tried that again on purpose i probably couldn't do it again ....


 This card is one I made for my nephew in South Africa who loves his soccer, I did a step card with the player upfront and the net on the third step it didn't work out exactly as I had envisioned it but I liked it none the less! I 3D'd the right boot and the ball with foam squares,  I got the image off the internet it was a colouring page that i found.


This one is a Penny Black image it is so beautiful as it so clearly depicts the love between a girl and her dad! I really like the way I did his denims I was a little nervous to try a denim but  really like the way it turned out, now I have to work on taking better photos lol.  This one was for a challenge that Copic Aus was hosting for the koala Kids with cancer foundation where they donated $10 for each card they received in for the challenge to the foundation, as well as all the cards that were entered had to be get well cards and they too werte given to the children.  A totally worthwhile attempt at an amazing prize - that I didn't win :( 75 Copics to the winner OMG I would still be celebrating :)


This cuty was also made for the Copic challenge, it is also a Penny Black called up up and away, I love this image she and the little bear are too cute for words.  I coloured her in very pastel shades and did my best to make her look a little vintage, I know the photo doesn't capture it that well.


 This one is Dr Marci from La La Land Crafts, she is a cutie but not one of my absolute favourites, she doesn't have that cupi (sp) doll look, or those precious Mabel Lucie Atwell qualities that I seem to be so fond of - and apparently have been since I was a little child.  But she is cute and I love all the different Marci characters so there may be a couple more in the future :)


This is one of my favourite digi's and sadly the blog I got it off no longer exsists, I  I think if I not mistaken it was called something like mijnstemples.blogspot.com I wish I knew what had happened because then I could credit these lovely images, If anyone knows any more details, please share!  She has such a sweet darling little face and the lines in the drawing are so fine, its a really lovely artist and very easy to colour, I also made this card for the copic challenge.


This nooni (colleen for cute) little fairy is a Penny Black, I love fairy's and think I will always.  There is something so playful and innocent about them and it is for that reason that I find fairy's such a sweet escape.  This cute little lady is from the Fairy sweet collection, her friends in the collection are just as nooni :)


This card is not coloured but it handmade and for those of you who are not fluent in reading hebrew, it says Shabbat Shalom, I made it for friends we went to for Friday night supper, the little candles are symbolic, but the rest of the card was just pretty :) I made an easle card and decorated the bottom with a simple rose and left space for the message.  It was really well received.


If you have managed to get to here I thank you for taking this time to read this long post, and look at what keeps me busy - sometimes during the day but mostly during the night LOL. I will dedicate a post to my night crafting soon as its a rather lot I have to say! 


If you have any questions or comments about my work I would be only to happy reply.  


Till next time Keep it Crafty